Are you tired of the glaring sun turning your car into a sauna? Or perhaps you want a little more privacy while you’re on the road?
Tinting your car windows might just be the perfect solution. Not only does it add a sleek, stylish look to your vehicle, but it also offers a range of practical benefits, from UV protection to improved comfort. Imagine cruising down the highway, shielded from prying eyes and relentless heat.
You can achieve this with a simple DIY project that won’t break the bank. Stick around, and you’ll discover the step-by-step process, tips, and tricks to perfectly tint your car windows like a pro. Don’t miss out on transforming your driving experience—your car will thank you!
Benefits Of Window Tinting
Tinting your car windows offers privacy and reduces glare. It helps keep the interior cooler and protects against harmful UV rays.
Tinting your car windows offers many advantages. It goes beyond just enhancing the appearance of your vehicle. Window tinting provides several practical benefits. These benefits improve your driving experience and protect your car’s interior. Let’s explore these benefits.
Improved Privacy
Tinted windows increase privacy for you and your passengers. They make it difficult for outsiders to see inside your car. This added privacy can deter potential thieves. You can feel safer when your personal belongings are not visible.
Reduced Glare
Sun glare can be blinding and dangerous while driving. Window tinting reduces this glare significantly. It allows for better visibility and safer driving. You won’t have to squint or struggle to see the road ahead.
Uv Protection
The sun’s rays can be harmful. Tinting your windows blocks up to 99% of UV rays. This protection shields your skin from sun damage. It also prevents fading and cracking of your car’s interior.
Temperature Control
Tinted windows help regulate the temperature inside your car. They keep your car cooler on hot days. This reduces the need for constant air conditioning. You save energy and enjoy a comfortable ride.
Enhanced Safety
Window tinting adds a layer of protection to your glass. In case of an accident, the tint helps hold shattered glass together. This reduces the risk of injury from flying glass pieces. Your safety is enhanced with tinted windows.
Energy Efficiency
By keeping your car cooler, window tinting improves energy efficiency. Your vehicle uses less fuel to maintain a comfortable temperature. This can lead to fuel savings over time. It’s a smart choice for eco-conscious drivers.
Increased Aesthetic Appeal
Tinted windows give your car a sleek and stylish look. They enhance the overall appearance of your vehicle. You can choose different shades to match your taste. It’s an easy way to personalize your car’s look.
Choosing The Right Tint
Selecting the ideal tint enhances privacy and protects against UV rays. Consider local regulations before choosing a shade. Quality tinting materials ensure longevity and clarity.
Choosing the right tint for your car windows can significantly impact both the appearance and functionality of your vehicle. It’s a decision that goes beyond aesthetics—considering factors like heat reduction, privacy, and legal compliance is crucial. In this section, we’ll explore the different types of window tints, and the legal considerations you need to keep in mind.
Types Of Window Tints
When selecting a window tint, you have several options to choose from, each with unique benefits and drawbacks:
- Dyed Tint:This type is popular for its affordability and ability to provide a dark appearance. It’s excellent for privacy but doesn’t offer much heat reduction.
- Metalized Tint:Known for its durability, this tint reduces heat effectively. However, it might interfere with electronic signals, impacting cell phones and GPS.
- Carbon Tint:Offering a sleek matte finish, carbon tints block a significant amount of infrared light. They’re a great choice for those looking to reduce heat without compromising signal strength.
- Ceramic Tint:The top-of-the-line option, ceramic tints block the most heat and UV rays without affecting electronics. They’re pricier, but the performance is unmatched.
Choosing the right type depends on your priorities. Are you more concerned with privacy, heat reduction, or perhaps the impact on your electronics?
Legal Considerations
Before you tint your car windows, understanding the legal aspects is essential. Different regions have varying laws regarding how dark or reflective your window tint can be.
- Check your local regulations to avoid fines. Tints that are too dark can lead to penalties.
- Some areas restrict tinting on certain windows, like the windshield, to ensure driver visibility.
- Consider having a professional install your tint to ensure compliance with all legal standards.
Ignoring these laws can lead to unnecessary headaches, and potentially costly fines. Wouldn’t you rather drive with confidence, knowing your tint is both stylish and legal?
Gathering Necessary Tools
Gather necessary tools like a heat gun, squeegee, and utility knife before starting. A clean work area helps. Ensure you have window film and a spray bottle with soapy water.
Gathering the necessary tools is crucial when tinting car windows. Proper preparation ensures a smooth and efficient process. Having the right equipment makes the job easier and helps achieve a professional finish. Before starting, it’s important to understand what tools are essential and which accessories might enhance the experience.
Essential Tools And Materials
For a successful window tinting, certain tools are indispensable. Here are the basics:
- Window Tint Film:Choose high-quality film for durability and appearance.
- Utility Knife:Useful for cutting the film to the right shape.
- Squeegee:Helps remove air bubbles and smooth the film.
- Spray Bottle:Fill with soapy water to clean the windows.
- Lint-Free Cloth:Cleans the glass without leaving residue.
- Heat Gun:Essential for molding the film around curves.
These tools form the foundation for effective window tinting. Having them ready ensures you won’t face interruptions during the process.
Optional Accessories
Some accessories can enhance the tinting experience. While not essential, they can provide additional convenience:
- Film Application Solution:Special solution aids in film placement.
- Tint Meter:Measures tint darkness to meet legal limits.
- Edge Trimmer:Offers precision in trimming film edges.
- Gloves:Protect hands during the application.
These items can make the task easier and improve results. Consider them if you want a more comfortable and efficient process.

Credit: kepler-dealer.com
Preparing Your Car
Tinting car windows improves privacy and reduces glare. Gather tools like a squeegee, film, and spray bottle. Clean windows thoroughly to ensure smooth application.
Preparing your car for window tinting is crucial for a smooth process. A well-prepared car ensures better tint adhesion and a cleaner finish. Let’s dive into the essential steps to get your car ready.
Cleaning The Windows
Start by thoroughly cleaning the windows. Use a glass cleaner and a microfiber cloth. Ensure no dirt or grime remains on the surface. Dirt can cause bubbles under the tint. Pay special attention to the edges and corners. Clean both the inside and outside of the windows. Double-check for any residue or streaks.
Measuring And Cutting The Tint
Measure each window carefully before cutting the tint. Use a tape measure for accuracy. Record the dimensions for each window separately. Lay the tint film on a clean, flat surface. Use a sharp utility knife for precise cutting. Cut slightly larger than the measured size. This allows for adjustments during application. Trim excess tint after installation for a perfect fit.
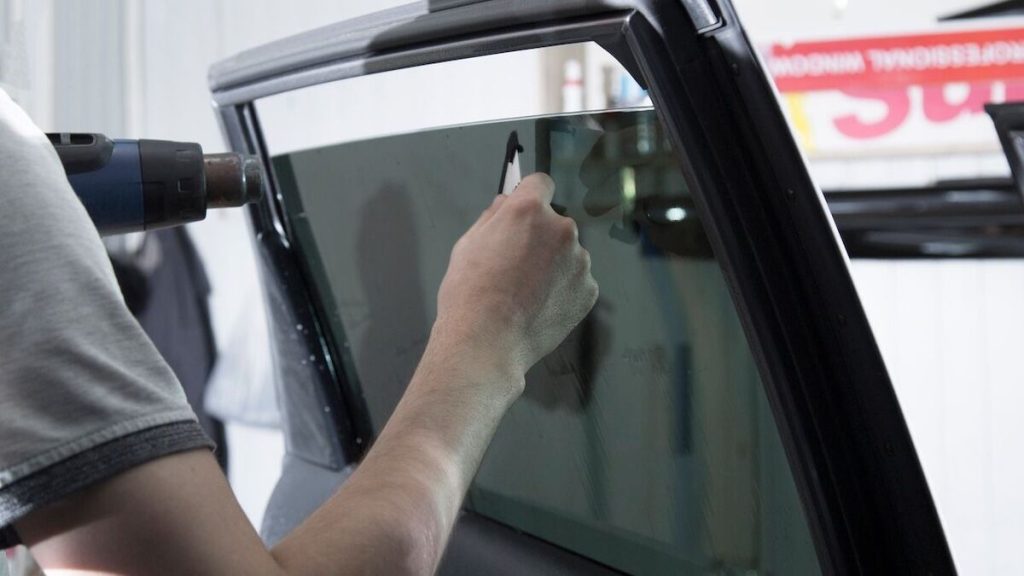
Applying The Tint
Begin by cleaning the windows thoroughly to ensure the tint adheres smoothly. Carefully measure and cut the film to fit each window. Apply the tint film using a squeegee, working from the center outward to remove air bubbles.
Applying tint to your car windows is a satisfying task. It requires patience and attention to detail. With the right approach, your windows will look professional. Let’s dive into the steps that ensure a smooth application.
Positioning The Tint
Begin by cutting the tint film slightly larger than the window. This extra allows for precise adjustments. Spray a mixture of soap and water on the inside of the window. It makes the surface slippery for easy positioning. Carefully peel the tint film from its backing. Align the top edge with the window’s top. Use a squeegee to hold it in place. Make sure the film covers the entire window surface. Trim any excess film with a sharp knife. This ensures a perfect fit.
Smoothing Out Air Bubbles
Air bubbles can ruin the look of tinted windows. Use a squeegee to remove them. Start from the center and move towards the edges. Apply gentle pressure to push the air out. Spray more soapy water if needed. It helps the squeegee glide smoothly. Repeat the process until all bubbles are gone. Take your time and check for any remaining bubbles. A bubble-free tint gives your car a sleek appearance. Enjoy the enhanced privacy and UV protection.

Credit: www.findlaycustoms.com
Finishing Touches
Completing the task of tinting your car windows brings satisfaction. The finishing touches ensure your tint looks professional and lasts longer. These final steps are crucial for achieving a sleek and polished appearance.
Trimming Excess Tint
Begin by identifying any excess tint on the edges. Use a sharp blade or knife for trimming. Carefully trace along the window’s edge for precision. Ensure the blade cuts smoothly without tearing the tint. Hold the tint steady to prevent shifting.
Check corners and curves, as these areas may need extra attention. Trim cautiously to avoid damaging the window’s surface. A steady hand is key here. Aim for clean edges for a polished look.
Final Checks
Inspect the entire window for bubbles or creases. Use a squeegee to smooth out any imperfections. Check for consistent adhesion of the tint to the window. Look for gaps or loose areas that need reapplication.
Ensure the tint adheres firmly around the edges. Use light pressure with your fingers to secure it. Confirm that the tint aligns perfectly with the window frame. A thorough inspection guarantees a professional finish.
Maintaining Tinted Windows
Regular cleaning helps keep tinted windows looking new. Use a gentle cleaner and soft cloth to avoid scratches. Avoid harsh chemicals that can damage the tint.
Maintaining tinted windows is crucial for ensuring they remain in top condition and provide the benefits you seek, like UV protection and enhanced privacy. Regular care can prolong the lifespan of your tint and keep your car looking sharp. What steps can you take to make sure your tinted windows stay pristine?
Cleaning Tips
Cleaning tinted windows requires a gentle approach. Use a soft cloth or sponge and mild soap to avoid scratches. Avoid ammonia-based cleaners, as they can damage the tint film. Regular cleaning prevents dust buildup, keeping your windows clear and your view unobstructed. Consider using a microfiber cloth for streak-free results. This simple swap can make a noticeable difference in your cleaning routine.
Protective Measures
Protecting tinted windows goes beyond just cleaning. Park your car in the shade to prevent the tint from fading due to sun exposure. This simple habit can significantly extend the life of your tint. Be mindful of sharp objects inside your car. Seatbelt clips or keys can easily scratch the tint if you’re not careful. Would investing in protective storage solutions within your vehicle be worth it? By incorporating these straightforward practices, you can maintain your tinted windows effectively.

Credit: www.amazon.com
Frequently Asked Questions
Can You Tint Your Car Window Yourself?
Yes, you can tint car windows yourself with a DIY kit. Ensure you follow local regulations on tint percentage. Proper tools and techniques are crucial for a smooth finish. Consider professional help for best results and legal compliance.
Is Tinting Your Own Windows Difficult?
Tinting your own windows can be challenging. It requires patience, precision, and the right tools. Mistakes may lead to bubbles or peeling. For best results, consider professional installation.
How Dark Can Tint Be In Nebraska?
Nebraska allows front side windows to have up to 35% tint darkness. Back side windows and rear windows can be tinted to any darkness level. Windshield tint is restricted to the top five inches. Ensure compliance with local regulations for vehicle safety and legality.
What’s The Darkest Legal Tint?
Legal tint darkness varies by state, usually around 30-50% for front windows. Back windows often allow darker tints. Always check local regulations to ensure compliance.
Conclusion
Tinting your car windows is a simple process. It protects your interior from sunlight. It also adds a stylish touch. Remember to check local laws about tinting. Some places have strict rules. Choose the right tint film for your needs.
Be patient during the application. Clean windows ensure a better finish. Practice makes perfect. With patience and care, you can do it yourself. Or consider hiring a professional if unsure. Enjoy your newly tinted windows. It’s worth the effort and time.
Drive with comfort and style. Your car will look great!